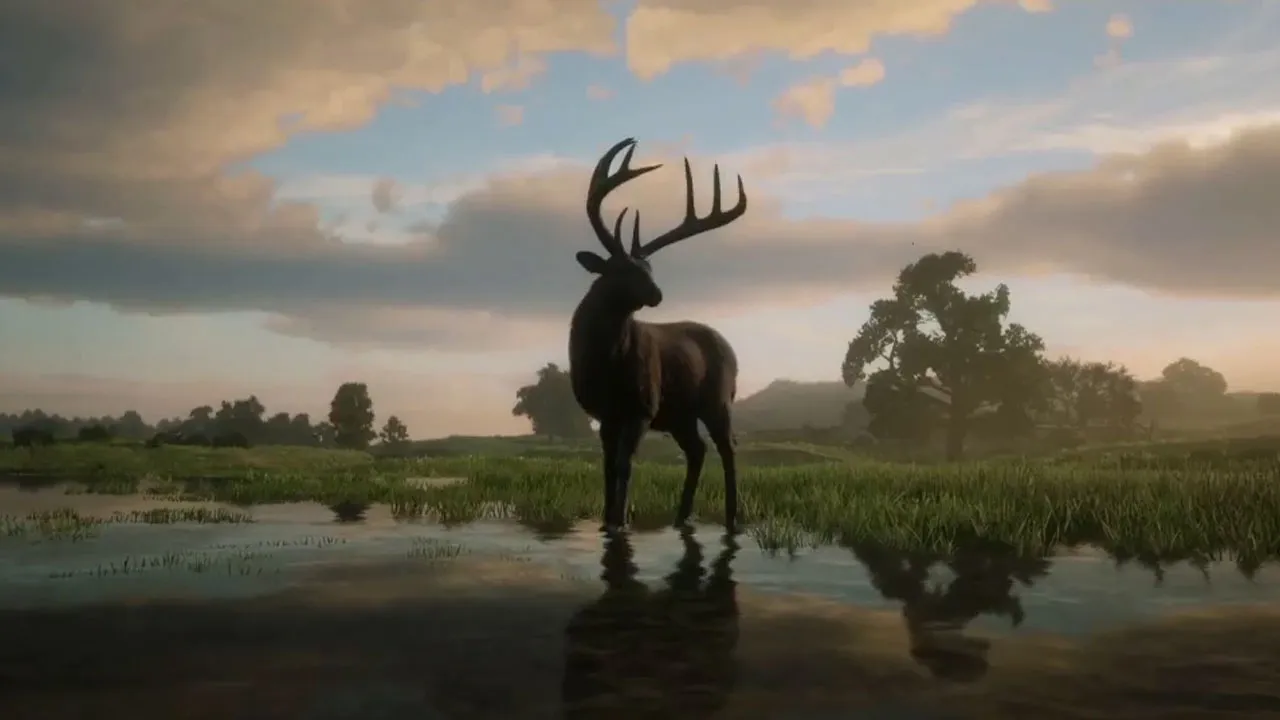
Hunting
Animals can be hunted for their meats, hides and other useful materials. Hunting is also required to complete other objectives.
On This Page
Hunting Equipment
When hunting, choose your weapon carefully to avoid ruining your reward. Carcasses that have been damaged by multiple wounds are worth less than that those that are broadly pristine.
- Use your lasso for bringing down deer for a clean knife kill.
- Level 7 unlocks the Bolt-Action Rifle ($216.00), a strong and versatile rifle, built to perform in any environment. Perfect for hunting large animals.
- At level 8 you unlock the Varmint Rifle ($72.00), designed for hunting small mammals and large birds, using a special low-caliber type of ammunition with reduced damage.
- At level 10 you unlock the bow ($124.00), hunter's weapon of choice. With the bow you can perform quiet and clean kills without scaring away the animals in the vicinity. For optimal results, try to aim your arrows at the head or neck of your prey. Note that you can call an animal while aiming at it. Doing so just before releasing your arrow can help you to land a clean shot when the animal raises its head to look in your direction. Small game arrows (better quality pelts from small prey) and poison arrows (a way to take down big animals quickly) are types of arrows that can prove extremely helpful when hunting.
- At level 12 you unlock the Lancaster Repeater ($243.00), good balance of fire rate and accuracy for medium game.
- The Rolling-Block Rifle ($411.00) is unlocked at level 13, designed for hunting large and massive beasts.
Reaching level 13 and spending $1,100, you have the weapon equipment you need to hunt all kind of animals.
Hunting Accessories
Bait will attract wild animals, with predators and herbivores responding to different varieties. Drop it on the ground, then hide nearby; it may take a few minutes for the creature to take notice. You can also use fresh carcasses to lure certain carnivores.
Animal Tracking
The easiest way to track nearby animals is to activate Eagle Eye by simultaneously pressing 
 . In Eagle Eye mode, animal tracks are clearly identified by luminous trails. You can then press
  /
/ to highlight the trails for a while, making them easier to follow.
Animal Parts
Once successfully hunted, most animals can be skinned. You can then decide what to do with the resulting goods. Depending on their size, animal parts are either stored in your satchel or stored on your horse by pressing  /
/ .
.
- You can cook and eat many types of meat when you rest at a campfire. Consuming food is one of the most convenient ways to maintain your attribute cores.
- You can deliver animal parts and donate them to Cripps Trading Co. as you are a Trader, or sell them to butchers.
- Many animal parts can be sold to Gus MacMillan. Some body parts can be crafted by MacMillan into trinkets.
Skinning animals and cooking meat ranks up your Dead Eye level.
| Animal | Skin | Carcass | Meat |
|---|---|---|---|
| Alligator | Skin | x | Big Game Meat |
| Armadillo | Skin | x | Stringy Meat |
| Badger | Pelt | x | Stringy Meat |
| Bat | - | x | Stringy Meat |
| Beaver | Fur | x | Stringy Meat |
| Bighorm | Hide | x | Gristly Mutton |
| Bison | Fur | - | Prime Beef |
| Bear | Fur | - | Big Game Meat |
| Boar | Skin | - | Tender Pork Loin |
| Buck | Fur | x | Mature Vanison |
| Bull | Hide | - | Prime Beef |
| Bullfrog | - | x | Herptile Meat |
| Chipmunk | - | x | Stringy Meat |
| Cougar | Fur | x | Big Game Meat |
| Cow | Hide | - | Prime Beef |
| Coyote | Fur | x | Stringy Meat |
| Crab | - | x | Crustacean Meat |
| Deer | Hide | x | Mature Venison |
| Elk Bull | Pelt | x | Mature Venison |
| Elk Cow | Pelt | x | Mature Venison |
| Fox | Fur | x | Stringy Meat |
| Gila Monster | Skin | x | Herptile Meat |
| Goat | Hide | x | Gristly Mutton |
| Iguana | Skin | x | Herptile Meat |
| Moose | Fur | x | Mature Venison |
| Muskrat | Fur | x | Stringy Meat |
| Opossum | Fur | x | Stringy Meat |
| Oxen | Hide | - | Prime Beef |
| Panther | Fur | x | Big Game Meat |
| Peccary | Skin | - | - |
| Pig | Skin | x | Tender Pork Loin |
| Pronghorn | Fure | x | Mature Venison |
| Rabbit | Pelt | x | Game Meat |
| Racoon | Fur | x | Stringy Meat |
| Rat | Pelt | x | Stringy Meat |
| Sheep | Hide | x | Gristly Mutton |
| Skunk | Fur | x | Stringy Meat |
| Snake | Skin | x | Stringy Meat |
| Turtle | - | x | Herptile Meat |
| Squirrel | Pelt | x | Stringy Meat |
| Toad | - | x | Herptile Meat |
| Wolf | Fur | x | Big Game Meat |
| Blue Jay | Feather | - | Gamey Bird Meat |
| Cardinal | Feather | x | Gamey Bird Meat |
| Chicken | Feather | x | Plump Bird Meat |
| Condor | Feather | x | Gamey Bird Meat |
| Cormorant | Feather | x | Gamey Bird Meat |
| Crane | Feather | x | Gamey Bird Meat |
| Crow | Feather | x | Gamey Bird Meat |
| Duck | Feather | x | Game Meat |
| Eagle | Feather | x | Gamey Bird Meat |
| Egret | Plume | x | Gamey Bird Meat |
| Goose | Feather | x | Plump Bird Meat |
| Gull | Feather | x | Gamey Bird Meat |
| Hawk | Feather | x | Gamey Bird Meat |
| Heron | Feather | x | Gamey Bird Meat |
| Loon | Feather | - | Gamey Bird Meat |
| Oriole | Feather | x | Gamey Bird Meat |
| Owl | Feather | x | Gamey Bird Meat |
| Pelican | Feather | x | Exotic Bird Meat |
| Pheasant | Feather | x | Game Meat |
| Pigeon | Feather | x | Gamey Bird Meat |
| Quail | Feather | x | Gamey Bird Meat |
| Raven | Feather | x | Gamey Bird Meat |
| Robin | Feather | x | Gamey Bird Meat |
| Rooster | Feather | x | Plump Bird Meat |
| Songbird | Feather | x | Gamey Bird Meat |
| Sparrow | Feather | x | Gamey Bird Meat |
| Spoonbill | Feather | x | Gamey Bird Meat |
| Turkey | Feather | x | Plump Bird Meat |
| Vulture | Feather | x | Gamey Bird Meat |
| Waxwing | Feather | x | Gamey Bird Meat |
| Woodpecker | Feather | x | Gamey Bird Meat |
| Teca Gator | Skin | - | - |
| Sun Gator | Skin | - | - |
| Banded Gator (*) | Skin | - | Big Game Meat |
| Owiza Bear | Pelt | - | - |
| Ridgeback Spirit Bear | Pelt | - | - |
| Golden Spirit Bear (*) | Pelt | - | Big Game Meat |
| Zizi Beaver | Pelt | - | - |
| Moon Beaver | Pelt | - | - |
| Night Beaver (*) | Pelt | - | - |
| Tatanka Bison | Pelt | - | - |
| Winyan Bison | Pelt | - | - |
| Payta Bison (*) | Pelt | - | - |
| Cogi Boar | Pelt | - | - |
| Wakpa Boar | Pelt | - | - |
| Icahi Boar (*) | Pelt | - | Tender Pork Loin |
| Mid Runner Buck | Pelt | - | - |
| Snow Buck | Pelt | - | - |
| Shadow Buck (*) | Pelt | - | - |
| Iguga Cougar | Pelt | - | - |
| Maza Cougar | Pelt | - | - |
| Sapa Cougar (*) | Pelt | - | - |
| Red Streak Coyote | Pelt | - | - |
| Midnight Paw Coyote | Pelt | - | - |
| Milk Coyote (*) | Pelt | - | - |
| Katata Elk | Pelt | - | - |
| Ozula Elk | Pelt | - | - |
| Inahme Elk (*) | Pelt | - | - |
| Ota Fox | Pelt | - | - |
| Marble Fox | Pelt | - | - |
| Cross Fox (*) | Pelt | - | - |
| Snowflake Moose | Pelt | - | - |
| Knight Moose | Pelt | - | - |
| Ruddy Moose (*) | Pelt | - | - |
| Nightwalker Panther | Pelt | - | - |
| Ghost Panther | Pelt | - | - |
| Iwakta Panther (*) | Pelt | - | - |
| Gabbro Horn Ram | Pelt | - | Gristly Mutton |
| Chalk Horn Ram | Pelt | - | Gristly Mutton |
| Rutile Horn Ram (*) | Pelt | - | Gristly Mutton |
| Emerald Wolf | Pelt | - | - |
| Onyx Wolf | Pelt | - | - |
| Moonstone Wolf (*) | Pelt | - | Big Game Meat |
(*) Can solely be found by doing missions after reaching rank 5 as Naturalist.
Animal Quality & Kill Quality
The animal parts you obtain when hunting game depend on two factors that might not be immediately apparent.
Every animal in the game has a "quality" that broadly reflects its physical condition. For example, you would naturally expect a healthy deer in the prime of its life to have a better pelt than a skinny specimen - and this is exactly what happens in the game. Secondly, the manner in which you kill an animal also influences your hunting spoils. The pelt of a wolf riddled with holes by a shotgun blast, for instance, will yield less meat and have a lower dollar value than one where you dispatch the creature with a clean headshot.
These two concepts - animal quality and kill quality - determine the nature of the parts you retrieve while skinning a creature.
Animal Quality
You can discover the quality of each animal by focusing on it (hold  /
/ ) while in close proximity, or through a scope or binoculars at range. Hold / to study it; once the circular gauge is full, you can press the button again to show the animal's information.
An animal's quality is revealed both in the "info" window and by the number of stars next to the creature's name when you study it or focus on it while in close proximity (1* = Poor; 2* = Good; 3* = Pristine).
Kill Quality
The quality of a kill is determined by two factors: what body part you hit, and which weapon you use.
Body Parts - The damage you deal depends on the body part that you hit. You are probably accustomed to the gaming concept whereby headshots always cause an instant kill. The same broadly applies in Red Dead Redemption2, though the overall system is rather more nuanced.
- Fatal Damage is inflicted when you hit vital organs. If an arrow or bullet strikes one of these regions, the target dies instantly - no matter how much health it has. For most animals, these body parts are the brain and the heart. They tend to be small so your aiming skills will need to be flaw less to hit them. You also need to take one additional factor in consideration: penetration. If you aim at the brain of a bison from the front, for example, your arrow or bullet can only reach the organ if it can penetrate the skull. This is where specialized weapons (such as scoped rifles) and ammunition (such as high velocity cartidges) can make difference. Aiming from different angles can also greatly help to avoid large bones or other body parts in the way.
- Critical Damage is inflicted when you hit critical organs such as the lungs or the stomach. Dealing critical damage is not necessarily lethal, but will cause the wound in question to bleed, greatly weakening the target. A critically-wounded animal might run away, but will often limp and eventually collapse. Both fatal and critical strikes consistently lead to clean, perfect kills when performed with the right weapon type.
- Normal Damage is caused when you hit any other body parts.
Optimal Weapons - Depending on the size of the prey, there are certain types of weapon and ammunition that are better suited than others for a clean kill.
A high animal quality and clean kill leads to better hunting loot, both quantitatively and qualitatively. If you are looking for a perfect-grade animal part, you will need to hunt an animal in pristine condition, and to dispatch it with clean, perfect kill with a suitable, maintained weapon and ammunition.
Animal Size & Optimal Weapons
Depending on the size of your current prey, you need to choose the weapon you use wisely if you wish to secure a perfect kill. There is at least one optimal weapon type for each size category.
Animal Size Groups
| Size | Category | Animals |
|---|---|---|
| Small | Birds | BlueJay, Booby, Cardinal, Waxwing, Crow, Oriole, Pigeon, Robin, Songbi1d, Sparrow, Woodpecker, Chicken, Duck, Loon, Parrot, Pheasant, Quail, Raven, Rooster, Gull |
| Reptiles | Bullfrog, Toad, Snake | |
| Mammals | Bat, Squirrel, Rat, Chipmunk | |
| Moderate | Birds | Eagle, Crane, Cormorant, Egret, Hawk, Heron, Owl, Pelican, Spoonbill, Turkey, Vulture, Condor, GoosePheasant |
| Reptiles | Iguana, Gila Monster | |
| Mammals | Rabbit, Armadillo, Badger, Muskrat, Possum, Raccoon, Skunk | |
| Medium | Mammals | Coyote, Fox, Pig, Beaver |
| Large | Reptiles | Alligator (small), Turtle |
| Mammals | Boar, Buck, Cougar, Panther, Big Horn Ram, Wolf, Deer, Pronghorn, Goat, Sheep, Peccary | |
| Massive | Reptiles | Alligator |
| Mamals | Bear, Bison, Bull, Elk, Moose, Ox, Cow |
Weapon Efficiency Per Animal Size
The carcasses of moderate, medium and large animals can be skinned, picked up, dropped, and stowed or removed from horseback. Massive animals can only be skinned; their carcasses cannot be transported.
You can load your horse up with pelts and carcasses that you collect, as long as you remain within the following limits:
- The carcass of one medium or large animal, or the pelt of one massive animal, across the back of your horse.
- The carcasses of two moderate animals hooked on either side of your horse.
- Multiple pelts of large, medium and moderate animals draped over the back of your horse.
- Note that all small animalparts are stored directly in your satchel.
Legendary Animals
Legendary Animals are hard to find and, in most cases, dangerous. Hunting them is challenging. A few legendary animals spawn during missions given by Harriet Davenport, most of them are encountered in the wild.
When you enter a legendary animal's territory, the game notifies you of this fact and your map is updated accordingly. Explore the area in Eagle Eye mode and you will soon reveal a first clue (shown on the radar with a small question mark icon).
If you are planning to hunt a legendary animal, make sure you are equiped with the right weapons and ammunition, and that you are in perfect shape for the encounter. Kill quality is not an essential factor when you take down a legendary animal; the items that they yield are unaffected by the means of their death, so you can take them out with your most lethal weapon. These battles tend to be fierce and the most resilient animals can tank a lot of damage.
Advice is to have a full Dead Eye meter to identify your target. It can also help to save your life - if an animal should notice you and charge, headshots could stop the animals in its tracks. Use the "Slow and Steady" ability card while on your horse. Your Horse will not buck you or run away.
Animal Habitats
Each animal species can be found in specific habitats. When searching for a particular type of animal, visiting the appropriate territories will give you the best chance to encounter the creatures you seek.
Tap or click an image to enlarge.

Alligator

Small Alligator

Sun Alligator
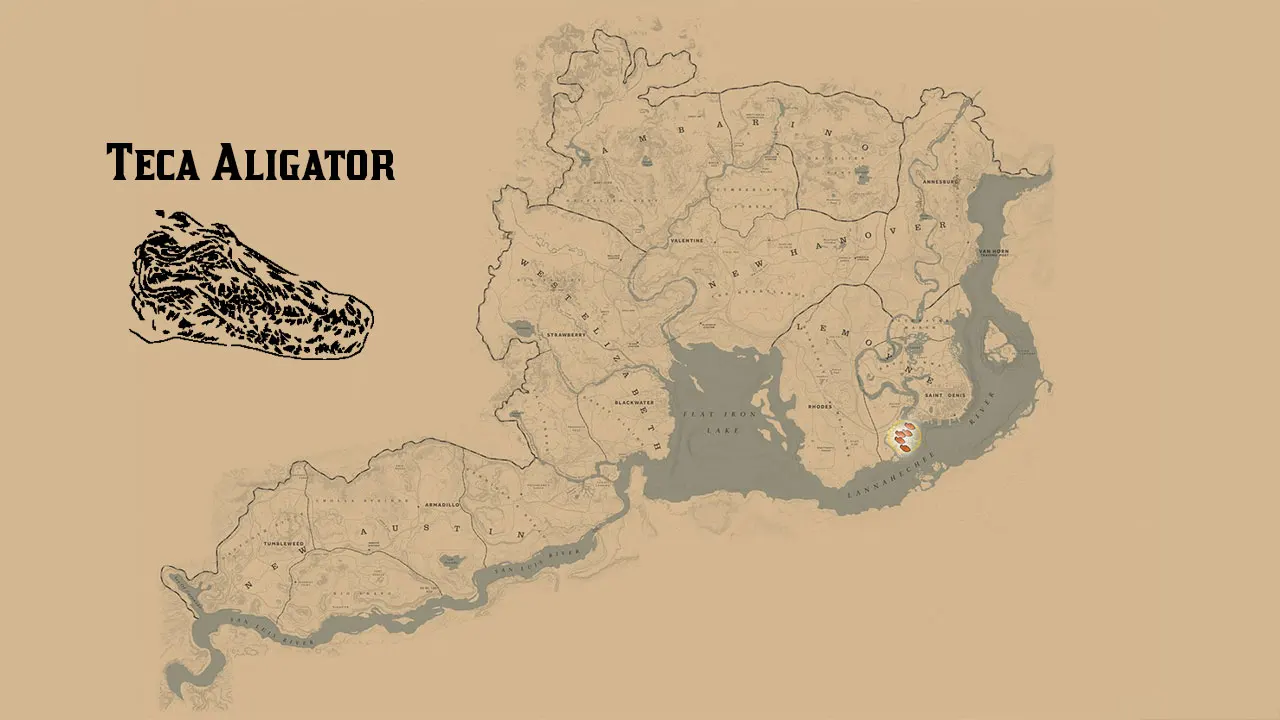
Teca Alligator

Armadillo
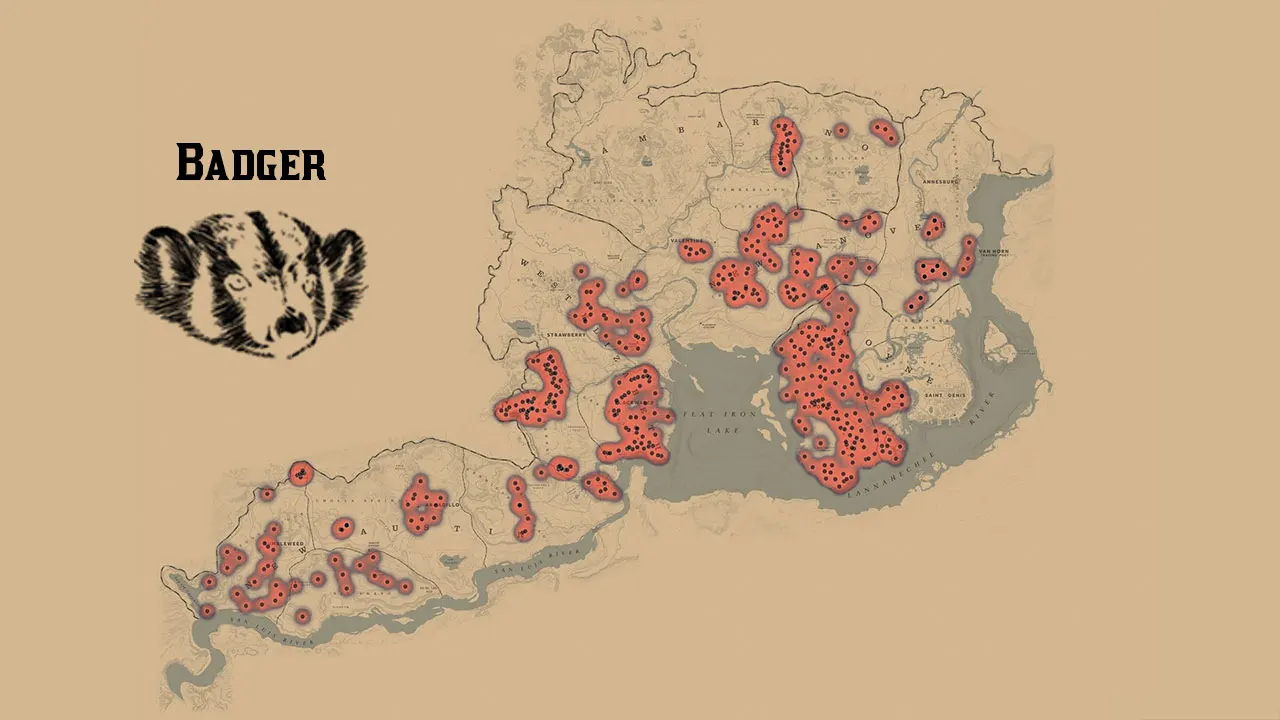
Badger

Bat

Black Bear

Grizzly Bear

Owiza Bear

Ridgeback Spirit Bear

Beaver

Moon Beaver

Zizi Beaver

Desert Bighorn Ram

Rocky Mountain Bighorn Ram

Sierra Nevada Bighorn Ram

Desert Bighorn Sheep

Rocky Mountain Bighorn Sheep

Sierra Nevada Bighorm Sheep

Bison

Tatanka Bison

Winyan Bison

Boar

Cogi Boar

Wakpa Boar

Buck

Mud Runner Buck

Snow Buck

Bull

Bullfrog

Cardinal

Cat

Chicken

Prairie Chicken

Chipmunk

Condor

Double Crested Cormorant

Neotropic Cormorant

Cougar

Iguga Cougar

Maza Cougar

Cow
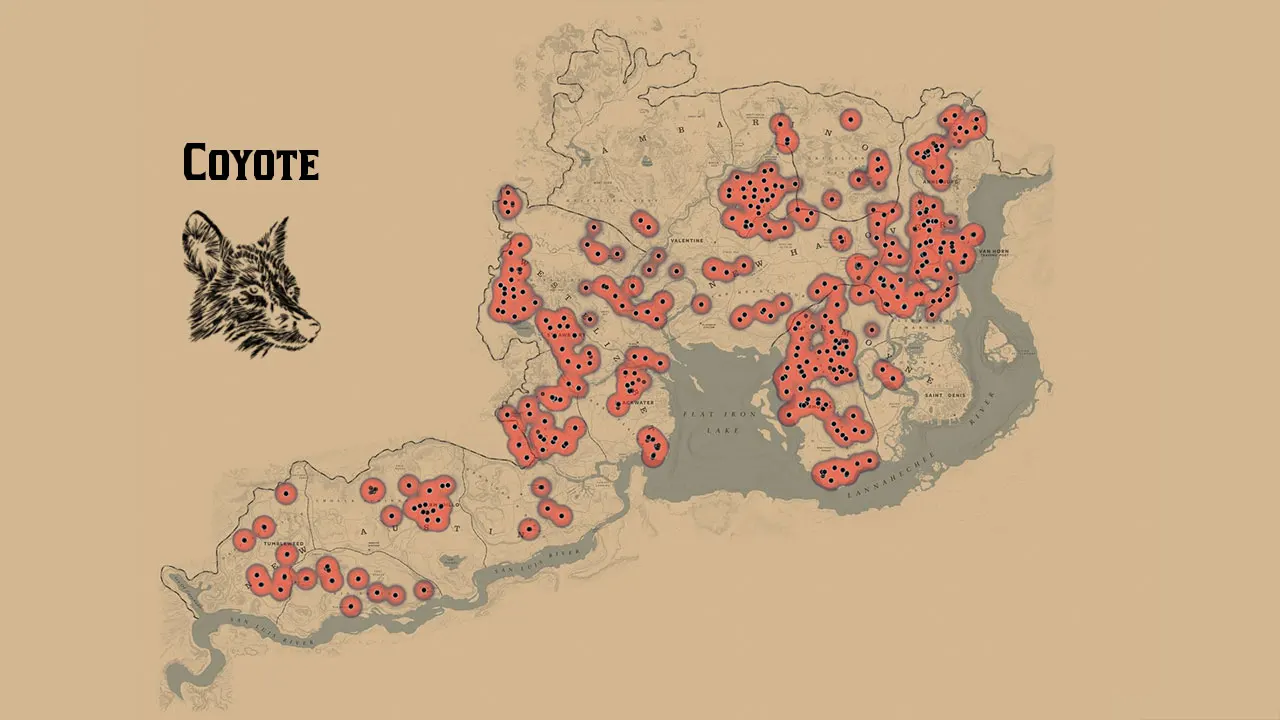
Coyote

Midnight Paw Coyote

Red Streak Coyote

Crab

Crane

Crow

Deer

Dog

Eagle

Egret

Elk Bull

Elk Cow

Katata Elk

Ozula Elk

Grey Fox

Marble Fox

Ota Fox

Red Fox

Gila Monster

Goat

Goose

Desert Iguana

Green Iguana
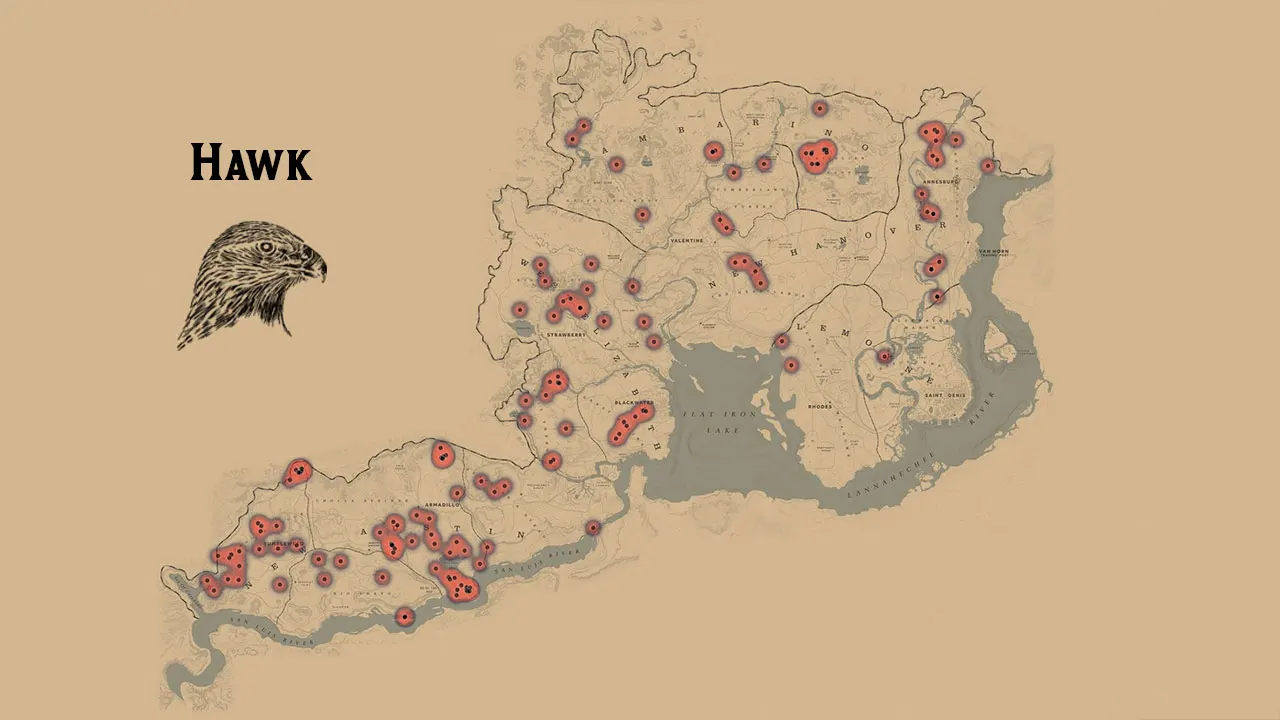
Hawk

Heron

Blue Jay

Loon

Moose

Knight Moose

Snowflake Moose

Muskrat

Baltimore Oriole
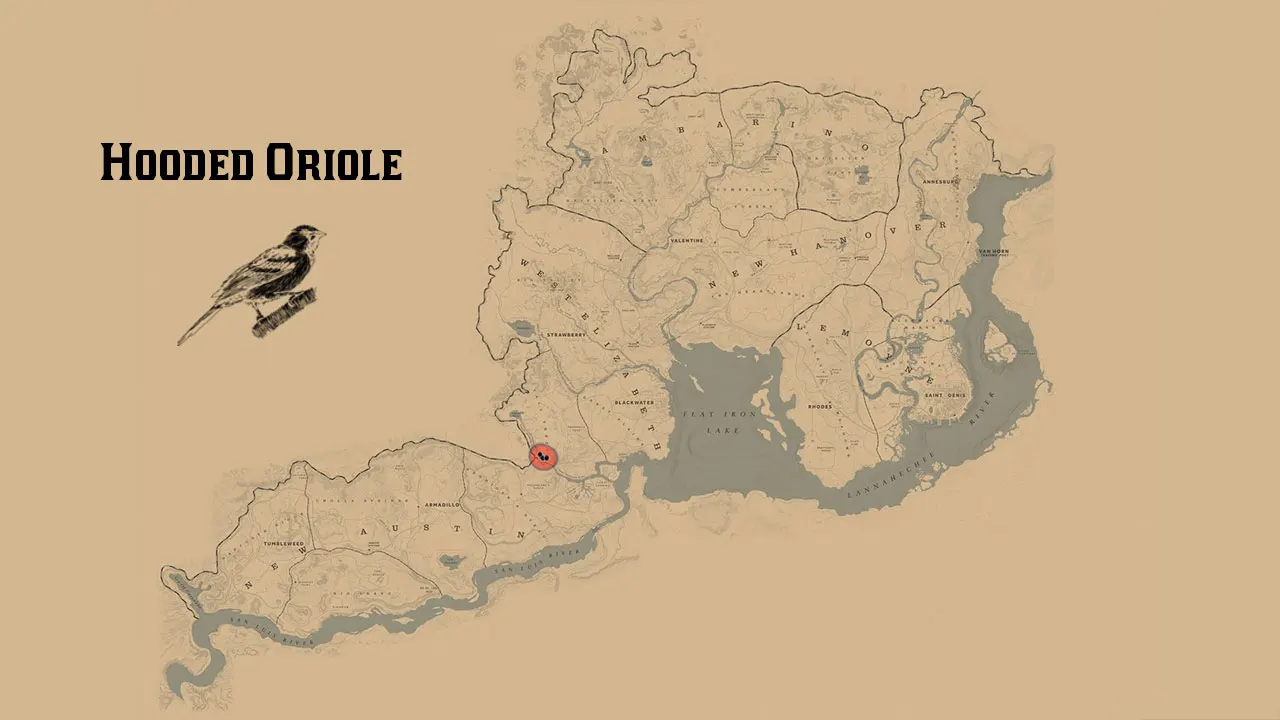
Hooded Oriole

ANIMAL

Owl

Ox

Panther
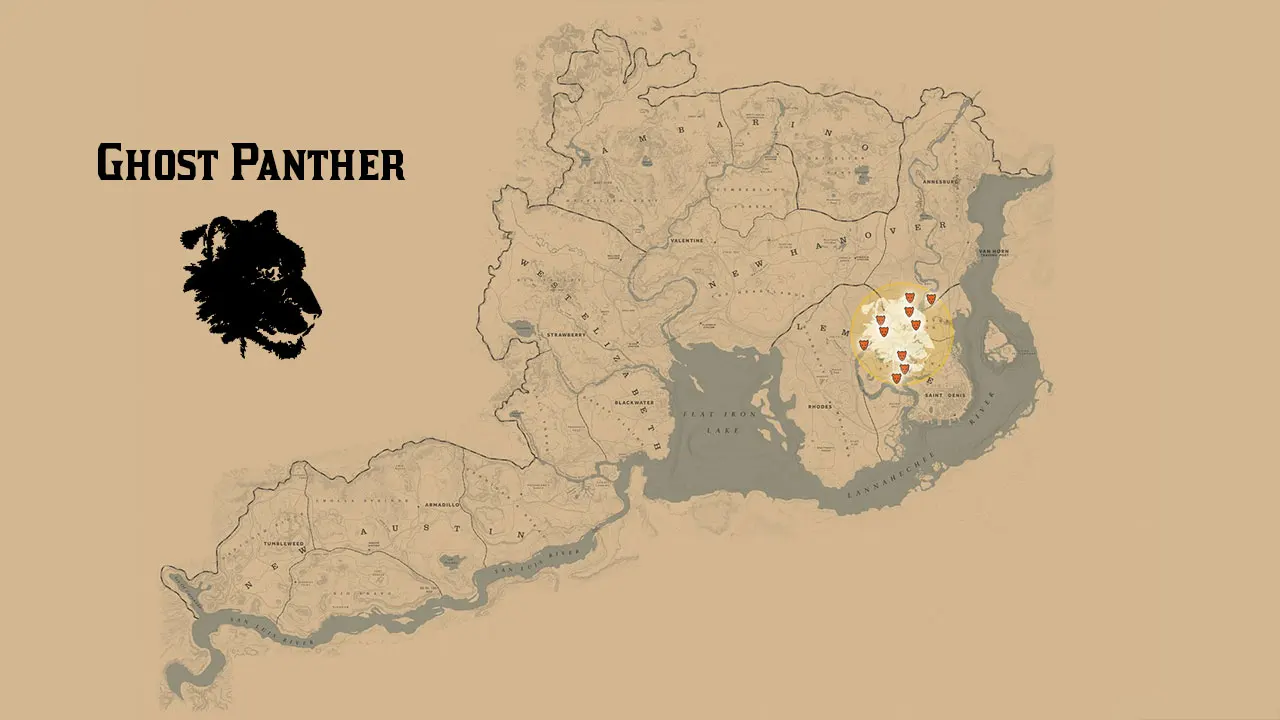
Ghost Panther

Nightwalker Panther

Peccary

Pelican

Pheasant
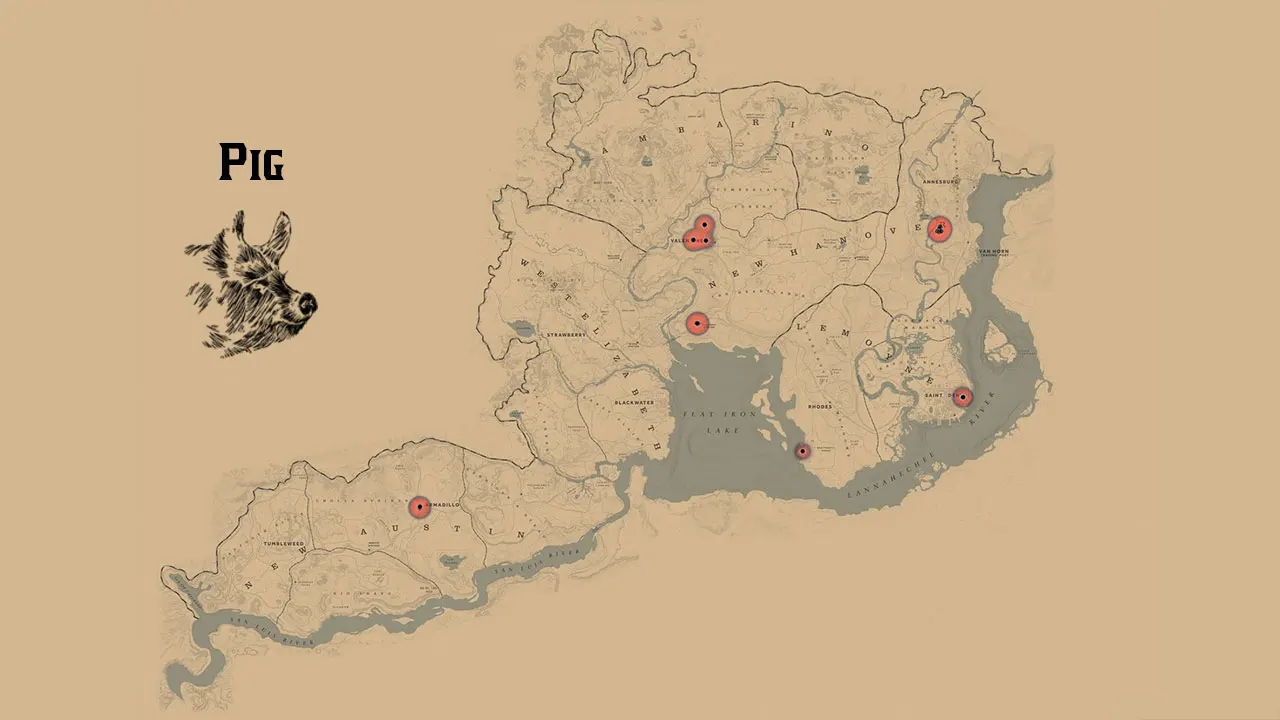
Pig
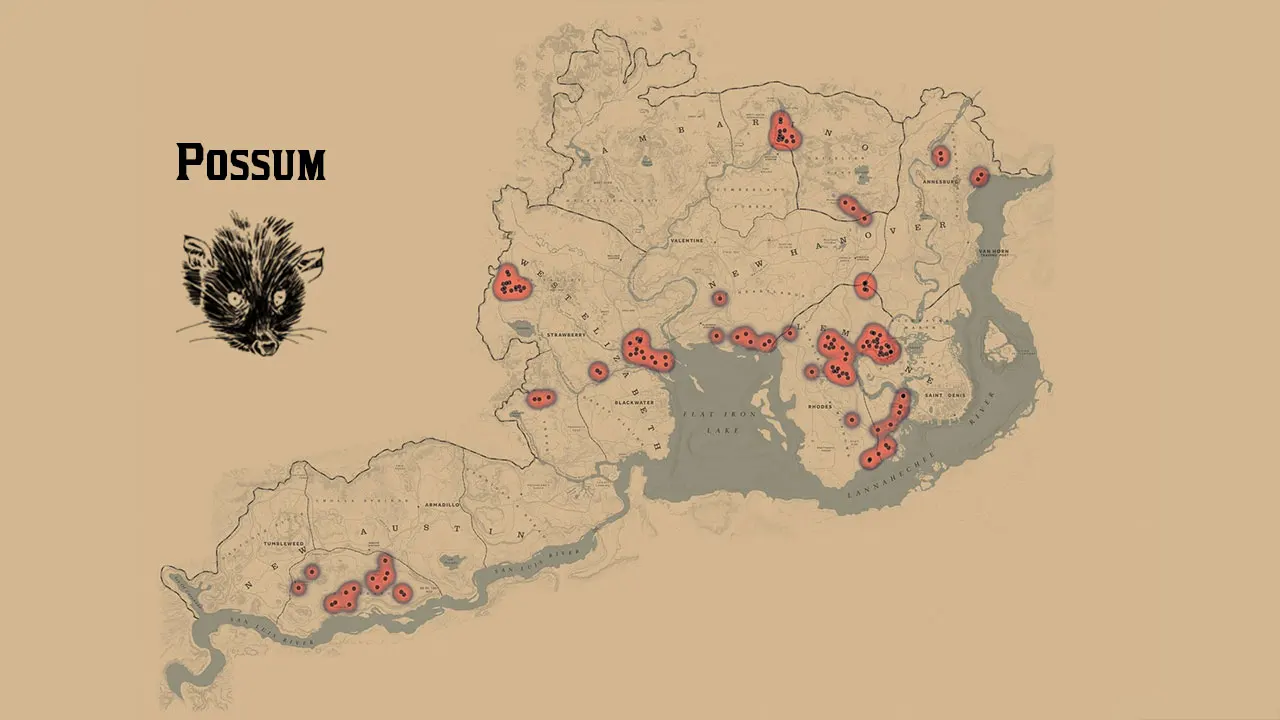
Possum
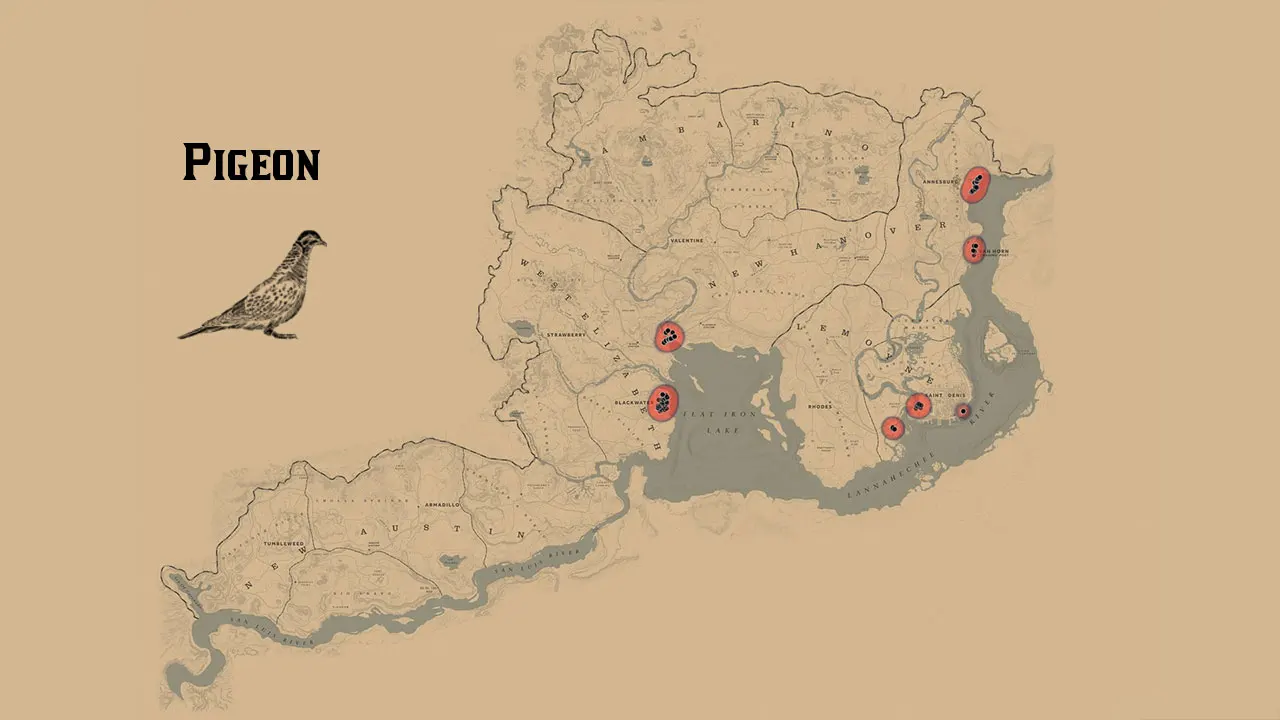
Pigeon

American Pronhorn Buck

Baja California Pronghorn Buck

American Pronghorn Doe

Baja California Pronghorn Doe

Quail

Rabbit

Racoon

Chalk Horn Ram

Gabbro Horn Ram

Rat

Raven

Robin

Rooster

Seagull
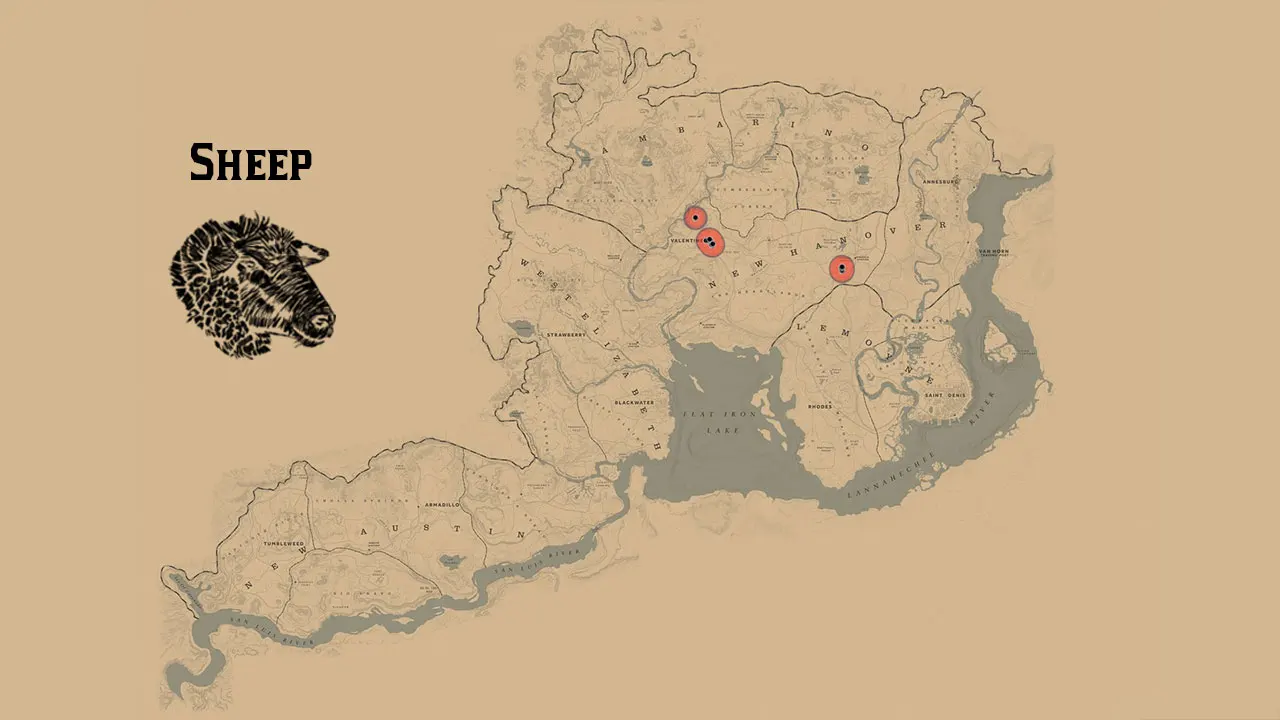
Sheep

Skunk

Snake
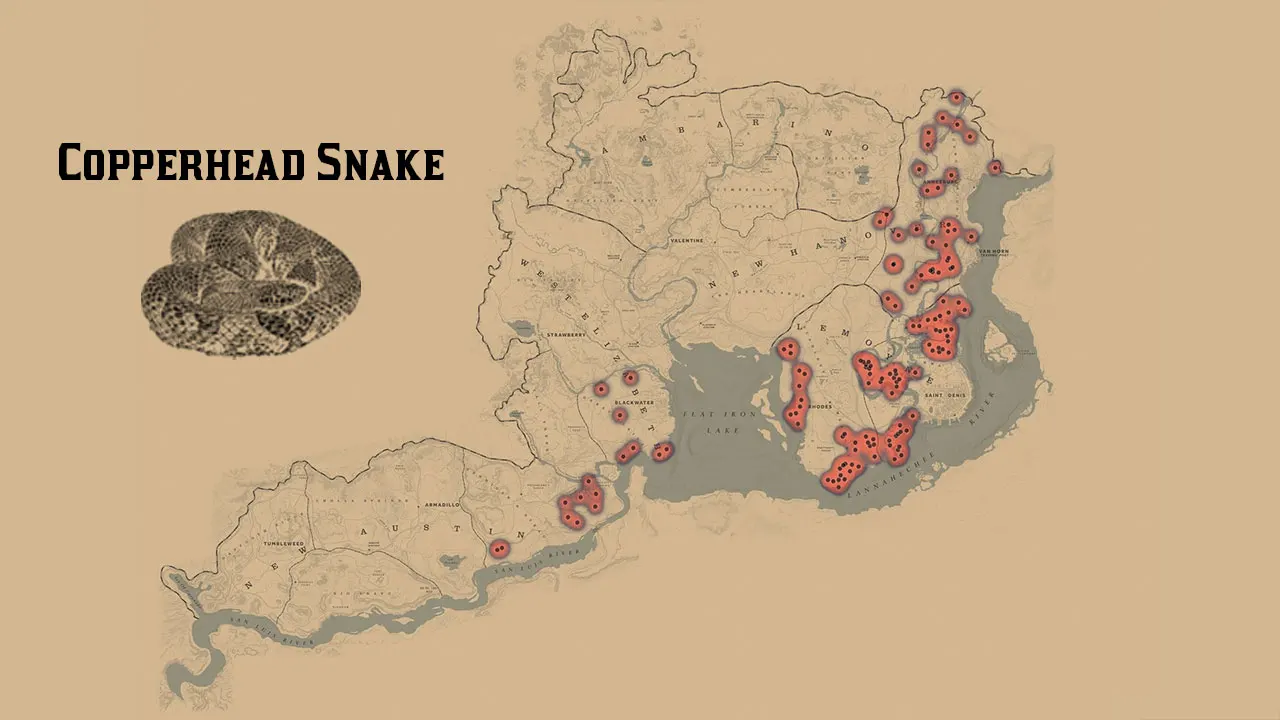
Copperhead Snake

Rattlesnake

Watersnake

Scarlet Songbird

Western Songbird

Sparrow

Spoonbill

Squirrel

Toad

Sonoran Desert Toad

Turkey

Turtle

Eastern Vulture

Western Vulture

Waxwing

Wolf

Emerald Wolf

Onyx Wolf

Woodpecker